Only action can relieve the uneasiness.
Java每天学一点
当初学java的时候,偷懒没怎么学,敲的代码太少.如今又选了java进阶.
从头开始,一点一点学吧.
1.如何对HashMap按键值排序
- 创建一个简单的HashMap,并插入一些键和值.
1
2
3
4
5
6
7
8
9
Map<String,Integer> aMap = new HashMap<String,Integer>();
//adding keys and values
aMap.put("Five", 5);
aMap.put("Seven", 7);
aMap.put("Four", 4);
aMap.put("Eight", 8);
aMap.put("One", 1);
aMap.put("Two", 2);
aMap.put("Three", 3); - 利用Set entrySet(): 返回Map.Entry对象的视图集,即映像中的关键字/值对
1
Set<Map.Entry<String,Integer>> mapEntries = aMap.entrySet();
- 从上述mapEntries创建LinkedList。我们将排序这个链表来解决顺序问题当然 ArrayList应该也是可以的.
1
List<Map.Entry<String,Integer>> aList = new LinkedList<Map.Entry<String,Integer>>(mapEntries);
1
2
3
4
5
6
7// sorting the List
Collections.sort(aList, new Comparator<Map.Entry<String,Integer>>(){
public int compare(Map.Entry<String, Integer> ele1, Map.Entry<String, Integer> ele2){
return ele1.getValue().compareTo(ele2.getValue());
}
}); - Collections.sort()是一个内置方法,仅排序值的列表。它在Collections类中重载。这两种个方法是
1
2
3public static <T extends Comparable<? super T>> void sort(List<T> list)
public static <T> void sort(List<T> list, Comparator<? super T> c) - 完整代码为
1
2
3
4
5
6
7
8
9
10
11
12
13
14
15
16
17
18
19
20
21
22
23
24
25
26
27
28
29
30
31
32
33
34
35
36
37
38
39
40
41
42package cn.edu.ahui;
import java.util.*;
public class SortHashMapByValues {
private static void sortMapByValues(Map<String, Integer> aMap){
Set<Map.Entry<String,Integer>> mapEntries = aMap.entrySet();
System.out.println("Values and Keys before sorting ");
for(Map.Entry<String,Integer> entry : mapEntries)
System.out.println(entry.getKey() + " - "+ entry.getValue());
//use LinkedList to sort, because insertion of elements in linked list is faster than ArrayList.
List<Map.Entry<String,Integer>> aList = new LinkedList<Map.Entry<String,Integer>>(mapEntries);
// sorting the List
Collections.sort(aList, new Comparator<Map.Entry<String,Integer>>(){
public int compare(Map.Entry<String, Integer> ele1, Map.Entry<String, Integer> ele2){
return ele1.getValue().compareTo(ele2.getValue());
}
});
// Storing the list into Linked HashMap to preserve the order of insertion.
Map<String,Integer> aMap2 = new LinkedHashMap<String, Integer>();
for(Map.Entry<String,Integer> entry: aList){
aMap2.put(entry.getKey(), entry.getValue());
}
// printing values after sorting of map
System.out.println("Values and Keys after sorting ");
for(Map.Entry<String,Integer> entry : aMap2.entrySet()){
System.out.println(entry.getKey() + " - " + entry.getValue());
}
}
public static void main(String[] args){
Map<String,Integer> aMap = new HashMap<String,Integer>();
//adding keys and values
aMap.put("Five", 5);
aMap.put("Seven", 7);
aMap.put("Four", 4);
aMap.put("Eight", 8);
aMap.put("One", 1);
aMap.put("Two", 2);
aMap.put("Three", 3);
sortMapByValues(aMap);
}
}
2.java中Comparator的用法(排序,分组)
下面是javaSE一些使用到Comparator接口的地方:
1 | Arrays.sort(T[],Comparator<? super T> c); |
- 使用场景
- 排序
- 分组
排序的例子在上面对HashMap排序已经说过了.
我们就直接看分组吧.
使用Comparator和for循环处理列表,来进行分类;通过调用者实现Comparator接口的比较逻辑,来告诉程序应该怎么比较,通过比较之后得结果来进行分组。比如生活中的拳击比赛,会有公斤级的概念,那么程序中应该实现的处理逻辑是只要两个人的体重在同一个区间则为同一组公斤级的选手。下面例子中按照手机的颜色和重量级别两个维度来进行分组,因此分组的核心逻辑其实就是比较逻辑。
1 | package com.jason.Collection; |
结果:
按颜色分组:
[Nubia [name=努比亚z7mini,color=黑金色, weight=143g], Nubia [name=努比亚z11mini,color=黑金色, weight=138g]]
[Nubia [name=努比亚X,color=蓝银色, weight=181g], Nubia [name=努比亚布拉格 ,color=蓝银色, weight=140g]]
[Nubia [name=努比亚红魔Mars,color=黑红色, weight=193g], Nubia [name=努比亚红魔3 ,color=黑红色, weight=215g]]
按重量级分组:
[Nubia [name=努比亚z7mini,color=黑金色, weight=143g], Nubia [name=努比亚z11mini,color=黑金色, weight=138g], Nubia [name=努比亚布拉格 ,color=蓝银色, weight=140g]]
[Nubia [name=努比亚红魔Mars,color=黑红色, weight=193g], Nubia [name=努比亚X,color=蓝银色, weight=181g]]
[Nubia [name=努比亚红魔3 ,color=黑红色, weight=215g]]
3.遍历map的四种方法及Map.entry详解
Map.entrySet() 这个方法返回的是一个Set<Map.Entry<K,V>>
Map.Entry 是Map中的一个接口,他的用途是表示一个映射项(里面有Key和Value),而Set<Map.Entry<K,V>>表示一个映射项的Set。Map.Entry里有相应的getKey和getValue方法,即JavaBean,让我们能够从一个项中取出Key和Value。
下面是遍历Map的四种方法:
1 | package com.jason.Collection; |
看HashMap的源代码:会发现,HashMap的底层实现用的是一个Entry数组.
我们在HashMap的源码的674行发现了Entry的定义,原来他是HashMap的一个内部类,并且实现了Map.Entry接口
我们再看一下Map.Entry这个接口是怎么定义的,发现原来他是Map的一个内部接口并且定义了一些方法
原来Entry实现的Map.Entry接口里面定义了getKey(),getValue(),setKey(),setValue()等方法相当于一个javaBean,对键值对进行了一个封装便于后面的操作,从这里我们其实也可以联想到不光是HashMap,譬如LinkedHashMap,TreeMap 等继承自map的容器存储key-value对都应该使用的是Entry只不过组织Entry的形式不一样,HashMap用的是数组加链表的形式,LinkedHashMap用的是链表的形式,TreeMap应该使用的二叉树的形式.想多了解一下的可以查看源码.
Only action can relieve the uneasiness. - 2020-03-18 20:20
4.常用快捷键
- ctrl+o: 快速outline
如果想要查看当前类的方法或某个特定方法,但又不想把代码拉上拉下,也不想使用查找功能的话,就用ctrl+o吧。它可以列出当前类中的所有方法及属性,你只需输入你想要查询的方法名,点击enter就能够直接跳转至你想去的位置。
- ctrl+e:快速转换编辑器
这组快捷键将帮助你在打开的编辑器之间浏览。使用ctrl+page down或ctrl+page up可以浏览前后的选项卡,但是在很多文件打开的状态下,ctrl+e会更加有效率。
alt + shift + r:重命名
重命名属性及方法在几年前还是个很麻烦的事,需要大量使用搜索及替换,以至于代码变得零零散散的。今天的Java IDE提供源码处理功能,Eclipse也是一样。现在,变量和方法的重命名变得十分简单,你会习惯于在每次出现更好替代名称的时候都做一次重命名。要使 用这个功能,将鼠标移动至属性名或方法名上,按下alt+shift+r,输入新名称并点击回车。就此完成。如果你重命名的是类中的一个属性,你可以点击alt+shift+r两次,这会呼叫出源码处理对话框,可以实现get及set方法的自动重命名。
shift+enter及ctrl+shift+enter
Shift+enter在当前行之下创建一个空白行,与光标是否在行末无关。Ctrl+shift+enter则在当前行之前插入空白行。
alt+shift+l以及alt+shift+m:提取本地变量及方法
源码处理还包括从大块的代码中提取变量和方法的功能。比如,要从一个string创建一个常量,那么就选定文本并按下alt+shift+l即可。如果同 一个string在同一类中的别处出现,它会被自动替换。方法提取也是个非常方便的功能。将大方法分解成较小的、充分定义的方法会极大的减少复杂度,并提 升代码的可测试性。
Alt+方向键
这也是个节省时间的法宝。这个组合将当前行的内容往上或下移动。在try/catch部分,这个快捷方式尤其好使。
ctrl+m
大显示屏幕能够提高工作效率是大家都知道的。Ctrl+m是编辑器窗口最大化的快捷键。
ctrl+.及ctrl+1:下一个错误及快速修改。配合Ctrl+Q,快速回到最后一次编辑的地方
ctrl+.将光标移动至当前文件中的下一个报错处或警告处。这组快捷键我一般与ctrl+1一并使用,即修改建议的快捷键。新版Eclipse的修改建议做的很不错,可以帮你解决很多问题,如方法中的缺失参数,throw/catch exception,未执行的方法等等。
ctrl+shift+f: 格式化代码
ctrl+Q 回到最后一次编辑的地方
Alt+左右方向键
我们经常会遇到看代码时Ctrl+左键,层层跟踪,然后迷失在代码中的情况,这时只需要按“Alt+左方向键”就可以退回到上次阅读的位置,同理,按“Alt+右方向键”会前进到刚才退回的阅读位置,就像浏览器的前进和后退按钮一样。
Ctrl+Shift+O 导入包
ctrl+d 删除当前行
Ctrl+Shift+X 把当前选中的文本全部变味小写
Ctrl+Shift+Y 把当前选中的文本全部变为小写
更多快捷键组合可在Eclipse按下ctrl+shift+L查看。
今天没有新知识,就学下eclipse快捷键吧.eclipse写java用起来还是很方便的.
Only action can relieve the uneasiness. —2020/03/20
5.耦合和解耦(转载)
百度解释:
耦合是指两个或两个以上的体系或两种运动形式间通过相互作用而彼此影响以至联合起来的现象。
解耦就是用数学方法将两种运动分离开来处理问题。
这是形象搞笑的比喻:
完全可以这么想像嘛,有一对热恋中的男女,水深火热的,谁离开谁都不行了,离开就得死,要是对方有一点风吹草动,这一方就得地动山摇。
可以按照琼瑶阿姨的路子继续想象,想成什么样都不过分,他们之间的这种状态就应该叫做“偶合”。
他们这么下去,有人看不惯了,有一些掌握话语权的权利机构觉得有必要出面阻止了,这样下去不是个事吖,你得先爱祖国,爱社会,爱人民,爱这大好河山才行啊,
于是棒打鸳鸯,让他们之间对对方的需要,抽象成一种生理需要,这就好办了,把她抽象成女人,他抽象成男人,当他需要女人时,就把她当做女人送来,反之亦然,
看上去他们仍在一起,没什么变化,实质上呢,他们已经被成功的拆散了,当有一天他需要女人时,来了另外一个女人,嘿嘿 他不会反对的。
对方怎么变他也不会关心了。这就是“解偶”。
较为具体的说明就是有的时候程序需要修改,我只需要改正一部分,单是如果程序的耦合性很强的话就需要从头再写一遍很不划算,而正常的开发中都是改那部分,重写那部分,
把配置文件一改就成了,java中通过接口(interface),spring技术中的IOC等实现的解耦合,重写覆盖父类的方法也是一种解耦行为
6.贫血模型,充血模型
程序中级设计讲到了,贫血模型和充血模型.要求设计一个虚拟钱包系统.
以该系统理解了贫血模型和充血模型的区别
- MVC三层架构
- 五个功能:充值、支付、提现、查询余额、交易流水。
- 业务划分两大块:虚拟钱包、三方支付。文中主要涉及虚拟钱包。
- 交易流水的两种实现方式:
- 一条记录,出账入账在一起;
- 两条记录,支付与被支付。文中推荐第二种。
- 交易流水还可以分两种形式:
- 基于虚拟钱包,一个典型的 Web 后端项目的三层结构。
- Controller 中,接口实现比较简单,主要就是调用 Service 的方法。
- 重点说Service 层,VirtualWalletBo 是一个纯粹的数据结构,只包含数据,不包含任何业务逻辑,业务逻辑集中在 VirtualWalletService 中。
基于充血模型的 DDD 开发模式
- 也是重点说Service 层,把虚拟钱包 VirtualWallet 类设计成一个充血的Domain 领域模型,并且将原来在 Service 类中的中的部分业务逻辑移动到 VirtualWallet 类中,让Service 类的实现依赖 VirtualWallet 类。
- 此例子中,领域模型 VirtualWallet 类很单薄,包含的业务逻辑很简单。不过,如果虚拟钱包系统需要支持更复杂的业务逻辑,那充血模型的优势就显现出来了。比如,我们要支持透支一定额度和冻结部分余额的功能。
在基于充血模型的 DDD 开发模式中,哪些功能逻辑会放到 Service 类中?
- Service 类负责与 Repository 交流。将流程性的代码逻辑与领域模型的业务逻辑解耦,让领域模型更加可复用。
- Service 类负责跨领域模型的业务聚合功能。
- Service 类负责一些非功能性及与三方系统交互的工作。
Repository层和Controller层继续沿用贫血模型
基于充血模型的DDD开发模式跟基于贫血模型的传统开发模式相比,Controller层和Repository层的代码基本上相同。 这是因为REpository层的Entity生命周期有限,Controller层的VO只是单纯作为一种DTO。两部分的业务逻辑都不会太复杂。业务逻辑主要集中在Service层。所以,Repository层和Controller层继续沿用贫血模型的设计思路是没有问题
- 基于贫血模型的传统开发模式
VirtualWaletController类VirtualWalletBo1
2
3
4
5
6
7
8
9public class VirtualWalletController {
// 通过构造函数或者 IOC 框架注入
private VirtualWalletService virtualWalletService;
public BigDecimal getBalance(Long walletId) { ... } // 查询余额
public void debit(Long walletId, BigDecimal amount) { ... } // 出账
public void credit(Long walletId, BigDecimal amount) { ... } // 入账
public void transfer(Long fromWalletId, Long toWalletId, BigDecimal amount) { ...} // 转账
}VirtualWalletService1
2
3
4
5public class VirtualWalletBo {// 省略 getter/setter/constructor 方法
private Long id;
private Long createTime;
private BigDecimal balance;
}1
2
3
4
5
6
7
8
9
10
11
12
13
14
15
16
17
18
19
20
21
22
23
24
25
26
27
28
29
30
31
32
33
34
35
36
37
38
39
40
41
42
43
44
45
46
47
48
49
50
51public class VirtualWalletService {
// 通过构造函数或者 IOC 框架注入
private VirtualWalletRepository walletRepo;
private VirtualWalletTransactionRepository transactionRepo;
public VirtualWalletBo getVirtualWallet(Long walletId) {
VirtualWalletEntity walletEntity = walletRepo.getWalletEntity(walletId);
VirtualWalletBo walletBo = convert(walletEntity);
return walletBo;
}
public BigDecimal getBalance(Long walletId) {
return virtualWalletRepo.getBalance(walletId);
}
public void debit(Long walletId, BigDecimal amount) {
VirtualWalletEntity walletEntity = walletRepo.getWalletEntity(walletId);
BigDecimal balance = walletEntity.getBalance();
if (balance.compareTo(amount) < 0) {
throw new NoSufficientBalanceException(...);
}
walletRepo.updateBalance(walletId, balance.subtract(amount));
}
public void credit(Long walletId, BigDecimal amount) {
VirtualWalletEntity walletEntity = walletRepo.getWalletEntity(walletId);
BigDecimal balance = walletEntity.getBalance();
walletRepo.updateBalance(walletId, balance.add(amount));
}
public void transfer(Long fromWalletId, Long toWalletId, BigDecimal amount) {
VirtualWalletTransactionEntity transactionEntity = new VirtualWalletTransactionEntity();
transactionEntity.setAmount(amount);
transactionEntity.setCreateTime(System.currentTimeMillis());
transactionEntity.setFromWalletId(fromWalletId);
transactionEntity.setToWalletId(toWalletId);
transactionEntity.setStatus(Status.TO_BE_EXECUTED);
Long transactionId = transactionRepo.saveTransaction(transactionEntity);
try {
debit(fromWalletId, amount);
credit(toWalletId, amount);
} catch (InsufficientBalanceException e) {
transactionRepo.updateStatus(transactionId, Status.CLOSED);
...rethrow exception e...
} catch (Exception e) {
transactionRepo.updateStatus(transactionId, Status.FAILED);
...rethrow exception e...
}
transactionRepo.updateStatus(transactionId, Status.EXECUTED);
}
} - 基于充血模型的DDD开发模式这种充血模型的设计思路,看起来领域模型VitualWallet类很单薄,包含的业务逻辑很简单,这种思路貌似没太大优势。
1
2
3
4
5
6
7
8
9
10
11
12
13
14
15
16
17
18
19
20
21
22
23
24
25
26
27
28
29
30
31
32
33
34
35
36
37
38
39
40
41
42
43
44
45
46
47
48
49
50
51
52
53
54
55
56
57
58
59
60
61
62
public class VirtualWallet { // Domain 领域模型 (充血模型)
private Long id;
private Long createTime = System.currentTimeMillis();;
private BigDecimal balance = BigDecimal.ZERO;
public VirtualWallet(Long preAllocatedId) {
this.id = preAllocatedId;
}
public BigDecimal balance() {
return this.balance;
}
public void debit(BigDecimal amount) {
if (this.balance.compareTo(amount) < 0) {
throw new InsufficientBalanceException(...);
}
this.balance.subtract(amount);
}
public void credit(BigDecimal amount) {
if (amount.compareTo(BigDecimal.ZERO) < 0) {
throw new InvalidAmountException(...);
}
this.balance.add(amount);
}
}
public class VirtualWalletService {
// 通过构造函数或者 IOC 框架注入
private VirtualWalletRepository walletRepo;
private VirtualWalletTransactionRepository transactionRepo;
public VirtualWallet getVirtualWallet(Long walletId) {
VirtualWalletEntity walletEntity = walletRepo.getWalletEntity(walletId);
VirtualWallet wallet = convert(walletEntity);
return wallet;
}
public BigDecimal getBalance(Long walletId) {
return virtualWalletRepo.getBalance(walletId);
}
public void debit(Long walletId, BigDecimal amount) {
VirtualWalletEntity walletEntity = walletRepo.getWalletEntity(walletId);
VirtualWallet wallet = convert(walletEntity);
wallet.debit(amount);
walletRepo.updateBalance(walletId, wallet.balance());
}
public void credit(Long walletId, BigDecimal amount) {
VirtualWalletEntity walletEntity = walletRepo.getWalletEntity(walletId);
VirtualWallet wallet = convert(walletEntity);
wallet.credit(amount);
walletRepo.updateBalance(walletId, wallet.balance());
}
public void transfer(Long fromWalletId, Long toWalletId, BigDecimal amount) {
//... 跟基于贫血模型的传统开发模式的代码一样...
}
}
这也是大部分业务系统都使用基于贫血模型开发的原因。
不过当虚拟钱包需要支持更复杂的业务的时候,它的优势就会显现出来。
比如要支持透支一定额度和冻结部分余额的功能,这是重新设计VirtualWallet类的实现代码贫血模型和充血模型1
2
3
4
5
6
7
8
9
10
11
12
13
14
15
16
17
18
19
20
21
22
23
24
25
26
27
28
29
30
31
32
33
34
35
36
37
38
39
40
41
42
43
44
45
46
47
public class VirtualWallet {
private Long id;
private Long createTime = System.currentTimeMillis();;
private BigDecimal balance = BigDecimal.ZERO;
private boolean isAllowedOverdraft = true;
private BigDecimal overdraftAmount = BigDecimal.ZERO;
private BigDecimal frozenAmount = BigDecimal.ZERO;
public VirtualWallet(Long preAllocatedId) {
this.id = preAllocatedId;
}
public void freeze(BigDecimal amount) { ... }
public void unfreeze(BigDecimal amount) { ...}
public void increaseOverdraftAmount(BigDecimal amount) { ... }
public void decreaseOverdraftAmount(BigDecimal amount) { ... }
public void closeOverdraft() { ... }
public void openOverdraft() { ... }
public BigDecimal balance() {
return this.balance;
}
public BigDecimal getAvaliableBalance() {
BigDecimal totalAvaliableBalance = this.balance.subtract(this.frozenAmount);
if (isAllowedOverdraft) {
totalAvaliableBalance += this.overdraftAmount;
}
return totalAvaliableBalance;
}
public void debit(BigDecimal amount) {
BigDecimal totalAvaliableBalance = getAvaliableBalance();
if (totoalAvaliableBalance.compareTo(amount) < 0) {
throw new InsufficientBalanceException(...);
}
this.balance.subtract(amount);
}
public void credit(BigDecimal amount) {
if (amount.compareTo(BigDecimal.ZERO) < 0) {
throw new InvalidAmountException(...);
}
this.balance.add(amount);
}
}
文章提到了一句化, 不要为了面向对象而面向对象.感觉很有道理,但又不是很理解.
领域驱动设计和开发实战
7.Generic 泛型
加入泛型之前:如果我们有如下需求:一个StringArr,你只想放string,但你并不能阻止其他类型数据放入。为了通用性,这样的数组一般都是Object。当我们获取里面的值的时候,就得强制转换,这就是它的缺点。
加入泛型之后: 例如:
ArrayList<String> stringValues=new ArrayList<String>();这样,就指定了具体的类型,添加一些数据的时候,如果不符合初定的类型,就会报错,安全性提高! 再有就是指定了具体的类型,提高了代码的质量,可读性提高!实现原理:
1
2
3
4
5
6
7
8
9
10import java.util.ArrayList;
public class Demo {
public static void main(String[] args) {
ArrayList<String> arrayString = new ArrayList<String>();
ArrayList<Integer> arrayInteger = new ArrayList<Integer>();
System.out.println(arrayString.getClass()==arrayInteger.getClass());#true
}
}如上,两者的类型分明不同,输出的结果却是true,这是因为,泛型它不会影响java虚拟机生成的汇编代码,在编译阶段,虚拟机就会把泛型的类型擦除,还原成没有泛型的代码,顶多编译速度稍微慢一些,执行速度是完全没有什么区别的。 这就是为什么,Java的泛型被称为“伪泛型”的原因
注意:
泛型变量不允许是基本数据类型,只能是他们的包装类
静态方法和静态变量不可以使用泛型类所声明的泛型类型参数
java泛型中的标记符含义
- E - Element (在集合中使用,因为集合中存放的是元素)
- T - Type(Java 类)
- K - Key(键)
- V - Value(值)
- N - Number(数值类型)
- ? - 表示不确定的java类型
- ? extends
- ? super
- S、U、V - 2nd、3rd、4th types
Object跟这些标记符代表的java类型有啥区别呢?
Object是所有类的根类,任何类的对象都可以设置给该Object引用变量,使用的时候可能需要类型强制转换,但是用使用了泛型T、E等这些标识符后,在实际用之前类型就已经确定了,不需要再进行类型强制转换。
泛型的使用
泛型有三种常用的使用方式:泛型类,泛型接口和泛型方法。
泛型类
一个泛型类(generic class)就是具有一个或多个类型变量的类。下面通过一个简单的Pair类作为例子。对于这个类来说,我们只关注泛型,而不会为数据存储的细节烦恼。下面是Pair类的代码:
1 | /* |
pair类引入了一个类型变量T,用尖括号(<>)括起来,并放在类名的后面。泛型类可以有多个类型变量。例如,可以定义Pair类,其中第一个域和第二个域使用不同的类型:
1 | public class Pair<T,U> { ... } |
类方法中的类型变量指定方法的返回类型以及域和局部变量的类型。例如:
1 | private T first; //uses the type variable |
1 | 用具体的类型替换类型变量就可以实例化泛型类型, |
泛型接口
1 | public interface Generator<T> { |
继承接口
1 | public class FruitGenerator implements Generator<String> { |
泛型方法
1 | public class ArrayAlg { |
这个方法是在普通类中定义的,而不是在泛型类中定义的。然而,这是一个泛型方法,可以从尖括号和类型变量看出这一点。注意,类型变量放在修饰符(这里是 public static)的后面,返回类型的前面
8.java编译
一直都在使用IDE来写java, 今天学习一下如何命令行来运行一个java项目
但是不只是运行一个HelloWorld.java文件,还要学习一下如果运行一个项目呢
- 使用javac命令java
可以通过只敲击javac 看到各种命令参数。
不带包名的类如何编译
新建一个HelloWorld.java文件
1 | public class HelloWorld { |
命令行进入当前文件的位置
命令:java HelloWorld.java
java HelloWorld
输出结果:
1 | D:\>javac HelloWorld.java |
那么如果输出是中文,会怎样?
我们输出一句”我来了”看一下结果1
2
3
4
5D:\>javac HelloWorld.java
HelloWorld.java:5: 错误: 编码 GBK 的不可映射字符 (0x86)
System.out.println("Hello World!,鎴戞潵浜?");
^
1 个错误编译不通过
输出 :你好”1
2
3D:\>javac HelloWorld.java
D:\>java HelloWorld
Hello World!,浣犲ソ编译成功,输出乱码
原因分析
javac是java compiler的命令,是将.java文件编译成.class文件的过程。我们需要先将文件读入内存,才能进行编译。
读入内存需要知道文件的编码格式,才能正确的将文件读取。我们查看一下java源文件的编码,发现是UTF-8。而java编译器默认的字符集可以通过如下代码查看。1
System.out.println(Charset.defaultCharset());
会发现输出GBK。
也就是java编译器认为文件采用GBK编码,而实际上文件是采用UTF-8编码。然后“你好吗”三个字的UTF-8码值,转换成GBK就是”浣犲ソ鍚�”,这个问号“�”就是一个GBK不可映射的字符。可以用下面的代码试一下:
1 | String s = "你好吗"; |
而如果是”你好”两个字的UTF-8码值转换成GBK是这三个字符”浣犲ソ”
1 | String s = "你好"; |
编译器使用了UTF-8的二进制值来尝试转换成GBK,第一次认识到了一个不认识的字符,因为UTF-8的范围很大,这个码值在GBK中没有,就报了这个错。
而第二次编译通过,是因为“你好”这两个字的UTF-8编码,恰好能转换成GBK编码,所以能编译通过。但是编译通过并不保证内容就是正确的,输出的时候仍然是乱码。
- 那么问题又来了
为什么我们通过IDE就能编译通过呢
通过IDE,不可能分开java文件编码和java compiler的编码格式的,文件设置成什么编码,编译器都会知道,就会用什么编码来解析。原生的javac不会这样,它只会按照默认的系统编码来编,这个时候如果文件编码不同,就出现这个问题了。
知道了原因,怎么解决,两种解决方案,最终目的是为了文件编码和解码字符集相同
1)如果文件是UTF-8编码的,我们使用-encoding UTF-8 来显式指定为UTF-8的编码格式
2)将文件改为GBK编码,如果使用windows自带的记事本,保存为ANSI,中国区域会使用GBK编码。如果使用其它高级文本编辑工具,如:notepad++、Emeditor、UE这样的,另存为指定格式。
带包名的类如何编译
1 | package demo2020; |
编译运行:
我们会发现编译成功,A.class被编译到了D盘根目录下。运行报错“错误:找不到或无法加载主类A”

- 原因分析:
- 有包的java程序,需要用完整包名来执行
由于我们没有指定classpath,jvm准备在当前路径下查找HelloWorld.class来装载,找了一圈没找到(确实有个HelloWorld类,但是HelloWorld类的完整路径是mypack.HelloWorld,所以不是这个),报错找不到或无法加载主类。 - 有包的java程序,文件路径中必须包含包名,并以包名结尾
jvm看了一下有包,于是将包转换为路径,也就是期望在D:/mypack文件夹下,找到HelloWorld.class文件进行装载。也没找到。
- 有包的java程序,需要用完整包名来执行
如果有包,java命令必须在包的上层目录执行完整路径名(完全限定名),上例中HelloWorld.class的完全限定名是mypack.HelloWorld。如果在D盘下,有一个HelloWorld.java,包路径为aaa.bbb.ccc,必须在D盘下,执行java aaa.bbb.ccc.A才行,此处的“在D盘下”,暂时可以看做直接在D盘下,也可以通过-cp指定到D盘下,这个后面还会说。
- 解决方法
我们可以使用-d . 来让编译器以当前路径为基准,自动创建包路径,这个-d .放在前面,放在后面都可以这个-d 可以将文件编译到指定目录下。1
2
3
4D:\>javac HelloWorld.java -d .
D:\>java mypack.HelloWorld
Hello World!
假设我们在D盘下创建一个aa的目录,然后执行javac -d aa A.java,效果不贴了.
使用-classpath指定包的上级目录
使用-classpath(或者 -cp,简写,意思相同)指定.class的目录,使用相对路径,绝对路径都可以,这个目录直接通到mypack的上级即可
我们可以通过-classpath指定.class在哪个根目录下,然后从这个目录拼接上包路径来构成完整路径。
java命令行运行java项目
有点烦躁了.去峡谷转一转,
Only action can relieve the uneasiness. —2020/03/21
9.异常处理
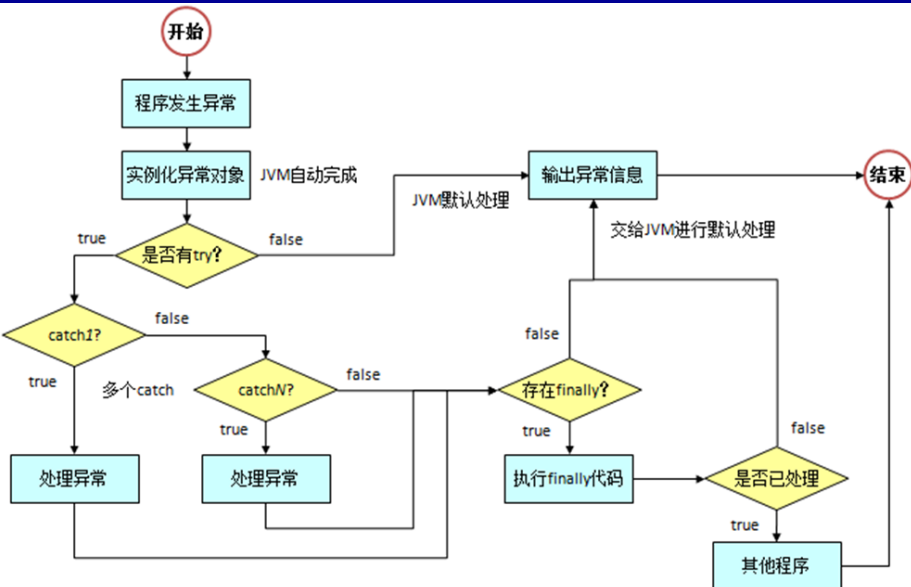
异常处理5个关键字
try-catch-finally
throwable类 异常方法
throws 和 throw 区别
Error与Exception的区别
Error(错误)是系统中的错误,程序员是不能改变的和处理的,是在程序编译时出现的错误,只能通过修改程序才能修正。一般是指与虚拟机相关的问题,如系统崩溃,虚拟机错误,内存空间不足,方法调用栈溢等。对于这类错误的导致的应用程序中断,仅靠程序本身无法恢复和和预防,遇到这样的错误,建议让程序终止。
Exception(异常)表示程序可以处理的异常,可以捕获且可能恢复。遇到这类异常,应该尽可能处理异常,使程序恢复运行,而不应该随意终止异常。
自定义异常
如果要自定义异常类,则扩展Exception类即可,因此这样的自定义异常都属于检查异常(checked exception)。如果要自定义非检查异常,则扩展自RuntimeException。
- 处理多个异常时,捕获范围小的异常要放在捕获范围大的异常之前处理
10. java反射
概念:Java反射说的是在运行状态中,对于任何一个类,我们都能够知道这个类有哪些方法和属性。对于任何一个对象,我们都能够对它的方法和属性进行调用。我们把这种动态获取对象信息和调用对象方法的功能称之为反射机制。
反射的应用场合:在编译时根本无法知道该对象或类可能属于哪些类,程序只依靠运行时信息来发现该对象和类的真实信息.
反射的作用:通过反射可以使程序代码访问装载到JVM 中的类的内部信息
获取已装载类的成员变量信息
获取已装载类的方法
获取已装载类的构造方法信息
常用方法:
- getName()获得类的完整名字
- getPackage()获取此类所属的包
- getSuperclass()获得此类的父类对应的Class对象
- getField(String name)获得类的指定属性
- getMethods()获得类的public类型的方法
- getMethod (String name,Class [] args)获得类的指定方法
每个Method对象对应一个方法,获得Method对象后,可以调用其invoke() 来调用对应方法 Object invoke(Object obj,Object [] args):obj代表当前方法所属的对象的名字,args代表当前方法的参数列表,返回值Object是当前方法的返回值,即执行当前方法的结果。
反射的缺点:
- 性能问题
1.使用反射基本上是一种解释操作,用于字段和方法接入时要远慢于直接代码。因此Java反射机制主要应用在对灵活性和扩展性要求很高的系统框架上,普通程序不建议使用。
2.反射包括了一些动态类型,所以JVM无法对这些代码进行优化。因此,反射操作的效率要比那些非反射操作低得多。我们应该避免在经常被 执行的代码或对性能要求很高的程序中使用反射。 - 使用反射会模糊程序内部逻辑
程序人员希望在源代码中看到程序的逻辑,反射等绕过了源代码的技术,因而会带来维护问题。反射代码比相应的直接代码更复杂。 - 安全限制
使用反射技术要求程序必须在一个没有安全限制的环境中运行。如果一个程序必须在有安全限制的环境中运行,如Applet,那么这就是个问题了 - 内部暴露
由于反射允许代码执行一些在正常情况下不被允许的操作(比如访问私有的属性和方法),所以使用反射可能会导致意料之外的副作用--代码有功能上的错误,降低可移植性。反射代码破坏了抽象性,因此当平台发生改变的时候,代码的行为就有可能也随着变化。
- 性能问题
如果只是用一两次,可以忽略反射对性能的影响,只有运行上百万千万次才会感觉到对性能明显的影响.
- 代码简介,提高代码的复用率,外部调用方便如果部用反射,,那么我们如果再加一个西瓜类,就得在Factory里判断,每添加一个类都要修改一次Factory,但用了反射只用在调用的时候传入完整的类名就可完成。结果:用反射,修改一处代码;不用反射,修改两处代码。
1
2
3
4
5
6
7
8
9
10
11
12
13
14
15
16
17
18
19
20
21
22
23
24
25
26
27
28
29
30
31
32
33
34
35
36
37
38
interface Fruit { //水果接口
public void eat() ; //吃水果
}
class Apple implements Fruit{ //定义苹果
public void eat() {
System.out.println("**吃苹果。");
}
}
class Orange implements Fruit{
public void eat() {
System.out.println("**吃橘子。");
}
}
class Factory{
public static Fruit getInstance(String className){
Fruit fruit = null ;
try{
fruit = (Fruit) Class.forName(className).newInstance() ;
}catch(Exception e ){
e.printStackTrace() ;
}
return fruit ;
}
}
public class FactoryDemo{
public static void main(String args[]){
//通过工厂类取得接口实例,传入完整的包.类名称
Fruit f = Factory.getInstance("cn.yonyong.reflection.testdemo.Apple") ;
if(f!=null){ //判断是否取得接口实例
f.eat() ;
}
}
}
[反_____射]https://blog.csdn.net/huangliniqng/article/details/88554510
java.lang
java.Class
11.杂文篇
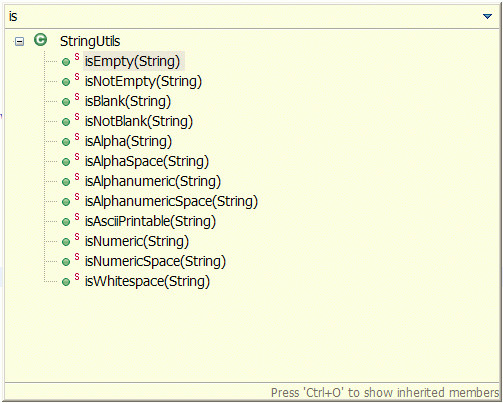
11.1 StringUtils
- public static boolean isEmpty(String str)
判断某字符串是否为空,为空的标准是str == null 或 str.length() == 0 - public static boolean isNotEmpty(String str)
- public static boolean isBlank(String str)
判断某字符串是否为空或长度为0或由空白符(whitespace)构成 - public static String trim(String str)
去掉字符串两端的控制符(control characters, char <= 32)
如果输入为null则返回null - public static String trimToNull(String str)
去掉字符串两端的控制符(control characters, char <= 32)
如果变为null或”“,则返回null - public static String strip(String str)
去掉字符串两端的空白符(whitespace), - public static String stripToNull(String str)
- public static String[] split(String str)
- 53.public static String[] split(String str, char separatorChar)
…不一一列举了.不需要背下来,大家看一遍 知道都能做什么就好了
https://www.cnblogs.com/liangjiejava/p/9850067.html
11.2 int和Integer的区别
基本区别:
- (1)Integer是int的包装类;int是基本数据类型;
- (2)Integer变量必须实例化后才能使用;int变量不需要;
- (3)Integer实际是对象的引用,指向此new的Integer对象;int是直接存储数据值 ;
- (4)Integer的默认值是null;int的默认值是0。
深入比较:
1 | public class Demo { |
11.3 null和“”的区别
本质的区别:
- null是没有地址的
- “”是有地址的,里面的内容为空
具体区别:
- 做成员变量(字段/属性/类变量)时,如果只写String str;那么是默认赋值为null的。null的话,你屏幕输出(toString方法)的结果为字符串null,而且其它调用str的操作,编译可通过,运行时会空指针异常,此时是异常。
- 做局部变量(方法里的变量)时,如果只写String str;是不会默认赋值null的,这里仅声明了一个str变量,在栈内存中有定义,但没有任何值,null其实也是一种值。此时任何调用str的操作,编译时就均会报错,是error,不是异常。
- “”是空字符串,但也是字符串,没有什么东西。 而null是空的意思,什么都没有,没有地址
String str = null;和String str1; 这两者也是不同的,前者是分配了内存,也就是说,你对他可以进行相关操作,而不会报错,后者是不可以的。
11.4 Java StringTokenizer
Java StringTokenizer 属于 java.util 包,用于分隔字符串。
- StringTokenizer 构造方法:
- StringTokenizer(String str) :构造一个用来解析 str 的StringTokenizer 对象。java 默认的分隔符是空格(“”)、制表符(\t)、换行符(\n)、回车符(\r)。
- StringTokenizer(String str, String delim) :构造一个用来解析 str 的 StringTokenizer 对象,并提供一个指定的分隔符。
- StringTokenizer(String str, String delim, boolean returnDelims) :构造一个用来解析 str 的 StringTokenizer 对象,并提供一个指定的分隔符,同时,指定是否返回分隔符。
- String Tokenizer常用方法
- int countTokens():返回nextToken方法被调用的次数。
- boolean hasMoreTokens():返回是否还有分隔符。
- boolean hasMoreElements():判断枚举 (Enumeration) 对象中是否还有数据。
- String nextToken():返回从当前位置到下一个分隔符的字符串。
- Object nextElement():返回枚举 (Enumeration) 对象的下一个元素。
- String nextToken(String delim):与 4 类似,以指定的分隔符返回结果。
- 实例实例2
1
2
3
4
5
6
7
8
9
10
11
12
13
14
15
16
17
18
19
20
21import java.util.*;
public class Main
{
public static void main(String[] args)
{
String str = "runoob,google,taobao,facebook,zhihu";
// 以 , 号为分隔符来分隔字符串
StringTokenizer st=new StringTokenizer(str,",");
while(st.hasMoreTokens()) {
System.out.println(st.nextToken());
}
}
}
//输出结果为:
runoob
google
taobao
facebook
zhihu1
2
3
4
5
6
7
8
9
10
11
12
13
14
15
16
17
18
19
20
21
22import java.util.*;
public class Main
{
public static void main(String args[])
{
System.out.println("使用第一种构造函数:");
StringTokenizer st1 = new StringTokenizer("Only action can relieve the uneasiness", " ");
while (st1.hasMoreTokens())
System.out.println(st1.nextToken());
System.out.println("使用第二种构造函数:");
StringTokenizer st2 = new StringTokenizer("Jason says : Only action can relieve the uneasiness", " :");
while (st2.hasMoreTokens())
System.out.println(st2.nextToken());
System.out.println("使用第三种构造函数:");
StringTokenizer st3 = new StringTokenizer("Jason says : Only action can relieve the uneasiness", " :", true);
while (st3.hasMoreTokens())
System.out.println(st3.nextToken());
}
}
注意,第二个参数是String类型,String类型中的每个字符都是分隔符,根据第三个构造函数的输出可以看出
如果我们想要分割一篇文章的词汇,统计所出现的次数,就可以将第二个参数设置为”,.?! ;:/“‘“ 双引号需要转义
11.5 equals和==的区别
他们最大的区别就是一个是方法,一个是关系操作符。
Object类中的equals方法源码:
1 | public boolean equals(Object obj) |
可见它直接比较的对象本身.
String类中的equals方法源码(重写Object中的):
1 | public boolean equals(Object anObject) { |
上面的equals比较当中,都运用到了==,这就说明,equals(不管哪个类中的)是==的扩展。
引用《java编程思想》中的原话:
关系操作符生成的是一个boolean结果,它们计算的是操作数的值之间的关系
总结:
- 当
==比较基本数据类型的时候,就是比较他们本身的值。 - 而
==比较引用数据类型的时候, 就是比较他们在内存的地址 - equals用来比较引用数据类型一般都要重写该方法。例如String类就重写了这个方法,
- 如果没有重写equals就直接比较,就是比较他们的内存地址
- equals不能用于基本数据类型
1 | public class Demo{ |
上面的str中存储的并不是“a”,而是它所指向的对象的地址。所以将他赋值给str2,比较他俩时返回的就是true
hashCode()方法也类似
11.6 string和各种格式互转 string转int int转string,其他类型转String
1 | String s = String.valueOf(value); // 其中 value 为任意一种数字类型。 |
- ASCII码
- 48-57 : 0-9
- 65-90: A-Z
- 97-122: a-z
11.7 java计算程序运行时间
1 | long startTime = System.currentTimeMillis(); //获取开始时间 |
以纳秒为单位:
1 | long startTime=System.nanoTime(); //获取开始时间 |
11.8 关于Set中toArray()
Set的toArray方法
下面是想把Set转换为String数组,于是就用到了Set的toArray()方法
1 | Set<String> set = new HashSet<String>(); |
程序编译的时候很正常,当运行的时候却报了 ClassCastException.
那么,String是Object的子类,而set.toArray()返回的就是一个Object数组,为什么就不能转换呢?
其实,String是一种类型, String[]是另一种类型,这是不同的概念。
Object可以强转为String(只要可以)不代表Object[]类型可以强转为String[]类型。
再者,对于Set而言,它只知道它内部保存的是Object,所以默认情况下,toArray只能是返回一个由这些Object构成的Object数组出来。但程序的作者或许更清楚其内部元素的更具体的类型,因此,HashSet类提供了toArray的另一个重载版本,允许用户指定一种比Object[]更具体的数组类型,方法是传递一个用户想要的数组类型的一个数组实例进去,多长都无所谓(因此我们常常使用一个0长度的,毕竟把类型带进去就OK了),于是,toArray内部就会按照你想要的这种类型,给构造一个数组出来。这样构造出来的数组,当然是很安全地被调用者转换回那个实际的类型。
划重点:
String 和String[]不是一种类型 ,不要犯想当然的错误。
11.9#### String类的深入理解
了解一个类的最好的方式就是看源码
1 | public final class String |
从以上的源码中可以获得信息
String是final类,这意味着,这个类不能被继承,也不可有子类,其中的方法默认都是final方法
String类是通过char数组来保存字符串的
String类对字符串的操作都是对新字符串操作。
也就是说,String对象一旦被创建就不会改变,任何改变操作都不会改变原字符串,而生成新的对象
字符串常量池
每当我们创建字符串常量时,JVM会首先检查字符串常量池,如果该字符串已经存在常量池中,那么就直接返回常量池中的实例引用。如果字符串不存在常量池中,就会实例化该字符串并且将其放到常量池中。由于String字符串不可变,所以常量池中一定不存在两个相同的字符串
静态常量池和运行时常量池
- 静态常量池,即.class文件中的常量池,class文件中的常量池不仅仅包含字符串(数字)字面量,还包含类、方法的信息,占用class文件绝大部分空间。
- 运行时常量池,则是jvm虚拟机在完成类装载操作后,将class文件中的常量池载入到内存中,并保存在方法区中,我们常说的常量池,就是指方法区中的运行时常量池。
想了解更多,文末给出原文链接
11.10 static深入分析
基本介绍:static的存在就是为了,不创建对象来调用这些属性或者方法,也是核心思想。
几种使用场景:
- 修饰“内部类”
- 修饰变量
- 修饰方法
- 修饰代码块
首先:修饰“内部类”,要注意普通类是不允许声明为静态的,只有内部类才可以。
1 |
|
修饰代码块时,执行的顺序(加载的顺序)如下:
父类静态变量
父类静态代码块
子类静态变量
子类静态代码块
父类普通变量
父类普通代码块
父类构造函数
子类普通变量
子类普通代码块
子类构造函数
总结一下就是,静态的先被加载(在这个基础上,父类优先于子类,在父类优先于子类的基础上,变量优先于代码块优先于构造函数(有的话))
方法区:
- 又叫静态区,跟堆一样,被所有的线程共享。方法区包含所有的class和static变量。
- 方法区中包含的都是在整个程序中永远唯一的元素,如class,static变量。
静态变量是所有线程共享的,所以不会消失。所以它具有那些特性。
一个小结:
- static是一个修饰符,用于修饰成员。(成员变量,成员函数)static修饰的成员变量 称之为静态变量或类变量。
- static修饰的成员被所有的对象共享。
- static优先于对象存在,因为static的成员随着类的加载就已经存在。
- static修饰的成员多了一种调用方式,可以直接被类名所调用,(类名.静态成员)。
- static修饰的数据是共享数据,对象中的存储的是特有的数据。
Only action can relieve the uneasiness. —2020/03/22
13 文件IO
File类的基本概念
- File是进行文件自身(目录)操作主要二点类
- 目录分隔符
分隔符有三种形式,//,\,或者Separator - 常用的方法
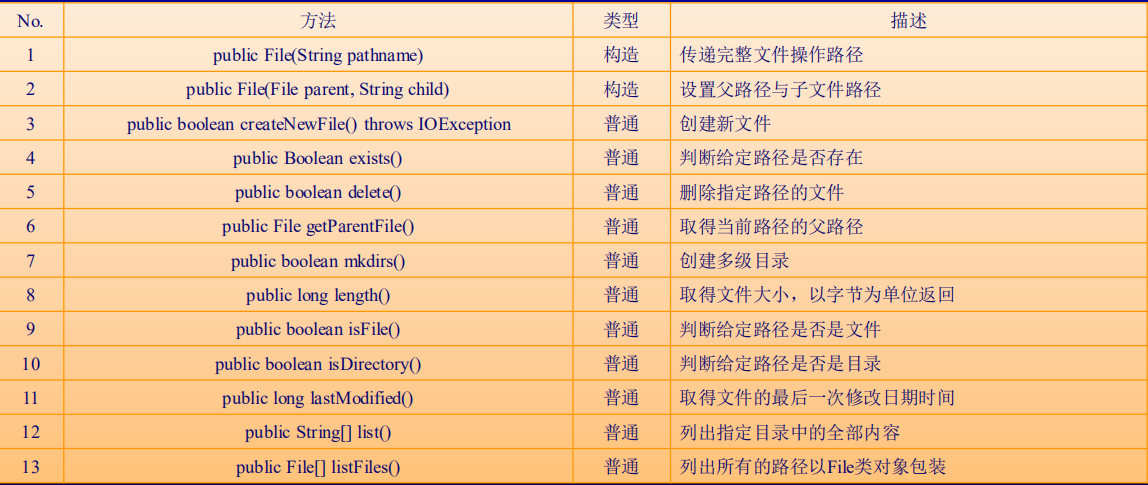
- 补充:
- I/O流表示输入源或输出目的地。 流可以表示许多不同的来源和目的地,包括磁盘文件、设备、其他程序和内存数组.
- 流支持许多不同类型的数据,包括简单字节、原始数据类型、本地化字符和对象。 有些流只是传递数据;另一些流操纵和转换数据 以有用的方式提供数据。
流的分类
不同的方式
- InputStream/OutputStream
- Byte Stream/Character Stream
- 节点流/处理流
四种不同的流
| Byte Stream | Character Stream | |
|---|---|---|
| Input | InputStream | Reader |
| Output | OutputStream | Writer |
| ##### 字节流 | ||
| - Java字节流结构 | ||
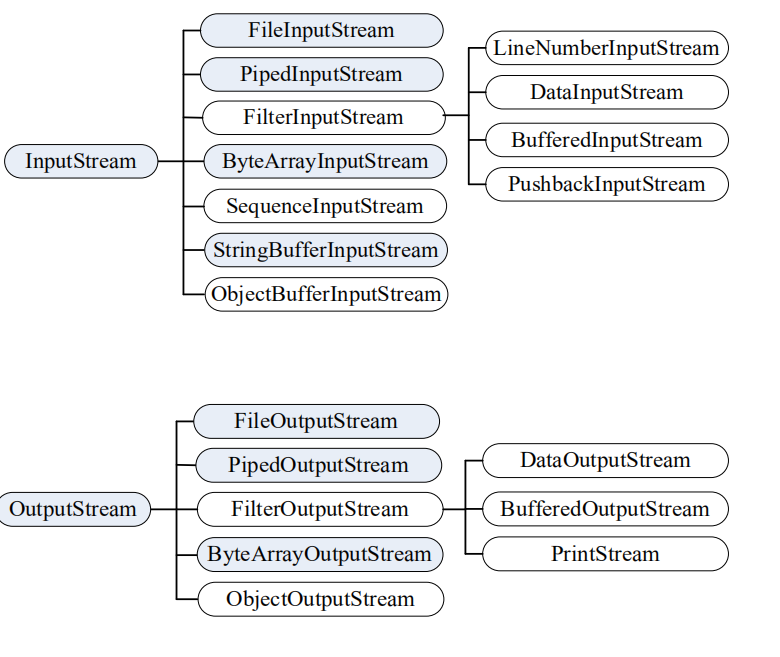 |
- OutputStream
- close()
- flush()
- write(int b):输出单个字节
- write(byte[] b): 输出全部字节数组
- write(byte[] b, int off, int len): 输出部分字节数组
- FileOutputStream
- InputStream
- read()
- read(byte[] b)
- read(byte[] b, int off, int len)- How to read date?
- Open a stream
- While more information
- Read information
- Close the stream
- How to write data?
- Open a stream
- While more information
- Write information
- Close the stream
字符流
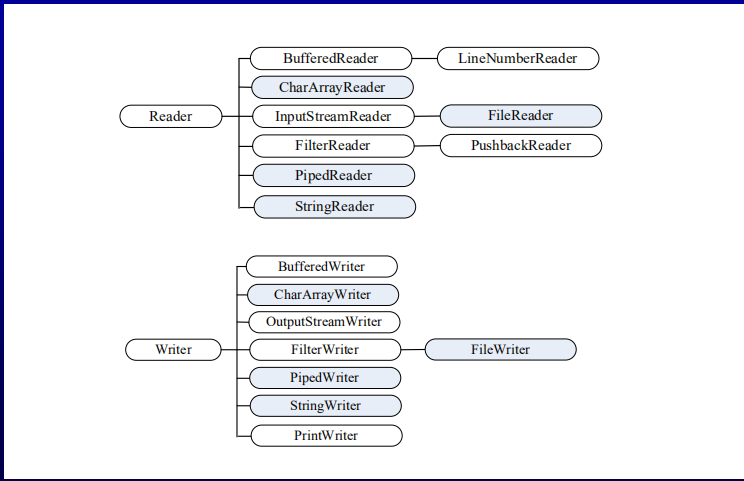
Write
- write(char[] cbuf) - write(char[] cbuf, int off, int len) - write(int c) - write(String str) - write(String str, int off, int len)Reader
- read() - read(char[], cbuf) - read(char[] cbuf,int off, int len) - read(CharBuffer target)字节流和字符流的区别
InputStreamReader
An InputStreamReader is a bridge from byte streams to character streams: It reads bytes and decodes them into characters using a specified charset.OutputStreamWriter
An OutputStreamWriter is a bridge from character streams to byte streams:Characters written to it are encoded into bytes using a specified charset. Thecharset that it uses may be specified by name or may be given explicitly, or theplatform's default charset may be accepted.编码
Encoding
计算机中所有的信息组成都是二进制数据,那么所有能够描述出的中文文字都是经过处理后的结果。在计算机的世界里,所有的语言文字都会使用编码来进行描述,最常见的编码是ASCII码- GDK:中文的国标编码,GBK包含有简体中文和繁体中文
- GB2312: 常用的简体
- iso8859-1
- unicode:
- utf编码(utf-8):融合了ISO8859-1和UNICODE编码的特点,在以后的所有开发里,使用的都是UTF-8编码
乱码:编码与解码的字符集不统一.
utf8中 中文占多少字节
一般是3个字节,最常见的编码方式是1110xxxx 10xxxxxx 10xxxxxx。
但再超大字符集中的更多数汉字要占4个字节.
click
Memory Stream
- Byte Memory Stream:
- ByteArrayInputStream
- ByteArrayOutputStream: toByteArray()
- Character Memory Stream:
- 输出流的问题
- 所有的输出数据必须以字节类型的数据为主。
- 如果输出的数据是int(Integer)、double(Double)、java.util.Date等常用类型怎么办?都需要将其转换为字节后才能输出。
- 为了解决这个问题,在java.io包中又专门提供了一组打印流以方便用户的输出操作
- 字节打印流:PrintStream
我们让用的System.out.Printout就是PrintStream类型的 - 字符打印流:PrintWriter
- 字节打印流:PrintStream
- 常用的操作方法

- PrintStream类的格式化输出
PrintStram类在最初设计时主要是为了弥补OutputStream输出类的功能不足,但是从JDK 1.5开始,为PrintStream增加了格式化输出的支持方法:- public PrintStream printf(String format, Object… args)。
- 利用这些方法可以使用像C语言那样的数据标记实现内容填充,常见
的输出标记为:整数(%d)、字符串(%s)、小数(%m.nf)、字符
(%c)
System类对IO的支持
System类是现在为止使用最多的一个类,所有的信息输出都会使用到“System.out.println()”或“System.out.print()”两个方法完成,而实际上System类中也专门提供了与IO有关的三个常量
- 系统输入:System.in
在许多的编程语言之中为了方便用户的交互操作,都会直接提供有一种键盘输入数据的操作功能,但遗憾的是在Java之中并没有提供这样可以直接使用的键盘输入操作,而要想实现此类操作必须采用IO处理的形式完成,而操作的核心就是利用System.in(此为InputStream类实例化对象)完成。缓冲输入流
在java.io包中如果要使用缓冲区进行数据操作, - 字符缓冲区流:BufferedReader、BufferedWriter;
- 字节缓冲区流:BufferedInputStream、BufferedOutputStream;
- 以上给出的四个操作类中,最为重要的就是BufferedReader类,此类是Reader的子类,属于字符缓冲输入流,而如果要处理中文数据,字符流是最方便的,BufferedReader类的常用方法如表所示。

Scanner
- BufferedReader的问题:
读取数据的时候只能按照字符串返回 - Scanner
- Constructor:Scanner(InputStream source)
- Two methods:
- Serializable(序列化)
- 堆内存->二进制数据流进行传输
- 并非所有类的对象都是可以被序列化,必须要实现
Serializable接口 - ObjectOutputStream:
- 反序列化
- ObjectInputStream:反序列化
Only action can relieve the uneasiness. —2020/03/23
14 Java序列化与反序列化
Only action can relieve the uneasiness. —2020/03/24
15 OOP
多态和继承
成员变量,静态方法看左边;非静态方法:编译看左边,运行看右边。
多态和继承
java 委托
抽象类和接口
abstract
- 抽象类不允许被实例化,只能被继承
- 它可以包含属性和方法.方法既可以包含代码实现,也可以不包含代码实现.不包含代码实现的方法叫做抽象方法.
- 子类(具体类)继承抽象类,必须实现抽象类中的所有抽象方法.
interfere
- 接口不能包含属性
- 接口只能声明方法,方法不能包含代码实现
- jdk8开始接口支持default 和static方法
- 类实现接口的时候,必须实现接口中声明的所有方法.
Only action can relieve the uneasiness. —2020/03/25
究竟何为面向对象?
首先,面向对象是一种思想,它呢是基于面向过程而言的,这种思想是对数据的一种优化这种思想是对数据的一种优化
其次,理解对象概念
- 什么是对象?
对象就是类的一个实例, - 什么是类?
类就是对一类事物的抽象,这类事物的共同特性就是程序中的属性,共同的行为就是方法。
例如:动物这个类。有属性name,有方法eat()。动物类的对象:狗,狗呢就具有name的属性和吃的行为。
面向对象的三大特征:封装、继承、多态。
- 封装:隐藏了对象的具体细节。提高了复用性和安全性
- 继承:两个类之间有一些的属性和方法的重复。就使用继承,这样既简化了代码,也提高了代码的复用性
- 多态:继承是多态的前提。体现在:父类对象的引用可以指向子类对象,这样提高了程序的扩展性
Collection 容器

java容器体系结构
==vs equals==- 原始类型
==用来表示两个变量的数值 - 引用类型
==用来地址的比较
- 原始类型
- equals
- 在Object类中
1
2
3public boolean equals(Object obj) {
return (this == obj);
} - 我们可以重写equals方法
例如 String类中就重写了equals1
2
3
4
5
6
7
8
9
10
11
12
13public boolean equals(Object anObject) {
if (this == anObject) {
return true;
}
if (anObject instanceof String) {
String aString = (String)anObject;
if (coder() == aString.coder()) {
return isLatin1() ? StringLatin1.equals(value, aString.value)
: StringUTF16.equals(value, aString.value);
}
}
return false;
}
- 在Object类中
- Collection
Methods of Collection- boolean add(E e)
- boolean addAll(Collection<? extends E> c)
- void clear()
- boolean contains(Object o)
- boolean containsAll(Collection<?> c)
- boolean equals(Object o)
- int hashCode()
- boolean isEmpty()
- Iterator
<E>iterator() - boolean remove(Object o)
- boolean removeAll(Collection<?> c)
- boolean retainAll(Collection<?> c)
- int size()
- Object[] toArray()
- default Stream
<E>stream() - Iterator
- Iterator and ListIterator
迭代器,用以方便的实现对容器内元素的遍历操作。- Methods of Iterator:
- hasNext
- next()
- default void remove() 好像是新增的不怎么使用
- Methods of Iterator:
List
List包含ArrayList,LinkedList,一般ArrayList比较常用且效率更好
- List的重要方法
- HashSet
- unsorted
- including null
- TreeSet
- Implementation of SortedSet
- sorted
- not including null
Comparable
如何对不同的对象进行排序
java.lang.Comparable接口对实现它的每个类的对象强制排序。这个接口只有一个方法
- public int compareTo(Object obj)
- return 0 : this == obj
- Return positive number:this > obj
- Return negative number:this <
- public int compareTo(Object obj)
实现此接口的所有对象都可以通过实现compareTo方法自动排序。
look hereMap
将键映射到值的对象。 映射不能包含重复的键;每个键最多可以映射到一个值。
Three main implementing classes
- HashMap :unsorted
- TreeMap: sorted
- HashTable : thread safe
常用的方法
- int size()
- boolean isEmpty()
- Object get(Object key)
- Object put(Object key, Object value)/putAll()
- Object remove(Object key)
- replace(K key, V oldValue, V newValue)
遍历方式
- Map.Entryset
1
2
3
4
5
6
7
8
9
10
11
12
13
14
15
16public class HashMapDemo {
public static void main(String[] args) {
Map<String,Integer> map = new Hashtable<String,Integer>();
map.put("one", 1);
map.put("two", 2);
map.put("three", 3);
Set<Map.Entry<String,Integer>> set = map.entrySet();
Iterator<Map.Entry<String,Integer>> iter = set.iterator();
while(iter.hasNext()) {
Map.Entry<String, Integer> ele = iter.next();
System.out.println(ele.getKey() + "=" + ele.getValue());
}
}
} - iterator
- for
- foreach
- listiterator
- enumeration
- Map.Entryset
final 和 static 关键字
lambda
jdk8新特性
‘->’
synchronized
java 多线程
Java 正则表达式
https://www.cnblogs.com/xyou/p/7427779.html